Thursday, July 21, 2016

Finally Ready To Begin

Well the smooth rods and linear bearing I ordered off of AliExpress arrived.  So I finally can begin the construction of my version of the Cherry printer.

I took some time to sort out the parts last night and for a "bare-minimum" printer, there were still a lot of parts to keep track of.  I have already identified a need for a picture of all the parts for the documentation.  So much to do...

Here are some of the initial tasks I will have to tackle first...

  1. Sort and document all the parts that will be used in the build
  2. Cut the pieces for the printer base
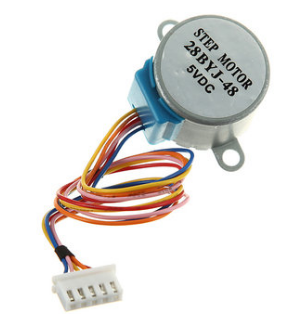
  3. Perform, record and document the bipolar conversion hack on 4 28BYJ-48 motors.
    1. Remove Cover
    2. Cut center trace
    3. Cut or de-solder red wire.
    4. Add extension wire
    5. Replace cover
  4. Cut the motor holes in the top deck of the printer base
    1. Z-Axis Motor Holes (ends)
      1. Assemble X-Axis carriage and X-Axis smooth rods with the X-Axis end pieces.
      2. Insert Z-Axis smooth rods into Z-Axis motor holders.
      3. Place the whole X-Axis assembly onto the Z-Axis smooth rods
      4. Measure or trace the position of the Z-Axis motors and their holders.
      5. Cut the motor holes as accurately as you can
    2. Y-Axis Motor Hole (center)
      1. Center the Y-Axis Motor Holder
      2. Trace the hole position
      3. Cut the motor hole
  5. Perform, record and document the initial assembly of the RAMPS 1.4 board
    1. (Research)
    2. Mount on the Mega
    3. Mount each stepper stick module
    4. Apply heat sinks to stepper stick
  6. Start a Build Manual on Google Docs
While I intend to cite every resource that I use to get this printer going, I will try to keep the document rather self-contained and complete.  By documenting each step... as I do it, I hope to build something that others will find helpful.

Well let me get to it... :-)

Monday, July 11, 2016

Cherry Printer Update

Well after about a month of shopping online and waiting, I still have critical pieces of the printer missing for the build. :-(  The pieces I am talking about are the linear shafts and bearings. Everything else I have ready to go.

In the interim, I have taken to using SketchUp to plan the build as well as to use for illustrations for the build document.  Here are some sample shots of what I have mocked up so far...


There are certain aspects of the build that I need to keep as flexible as possible.
  • Varying Smooth Rod Lengths
  • Optional Z-Axis Frame for Better Bracing
  • Different Build Plate Sizes And Types
  • Different Bowden Extruders


Wednesday, June 15, 2016

Initial Cost Projections

While the availability of most of the components is pretty high, there are some parts that will be hard to come by.

Smooth Rods (8mm)
Six of these are needed to for the three axis that will be traversed during printing.  While the design calls for 4 x 17.5cm rods and 2 x 22cm rods, coming by these dimensions may be difficult.  So I am prepared to substitute and use other lengths.

Threaded Rod (M5)
The metric M5 threaded rod will also have to be sourced.  Threaded rods in my location are all based on English units which makes a difference in the configuration of the printer.

The rest of the parts should be readily source-able...

DescriptionPriceQuantityTotal
12 - LM8UU Linear bearings$8.081$8.08
2 - GT2 Pulleys + GT2 Belt$5.241$5.24
10 - 624 Bearings$2.761$2.76
Bowden Extruder Drive + NEMA 17 Stepper$17.501$17.50
PTFE Tube$2.001$2.00
Arduino Mega + RAMPS 1.4 + 4xA4988$22.791$22.79
28BYJ-48 Stepper Motor$1.654$6.60
3 - Endstop Switches$2.691$2.69
Hotend$9.991$9.99
$77.65

Monday, June 13, 2016

My Next Obsession

I have been feeling the bug for a new project, and I think I have one.  I think I would like to build my own 3d-printer based on the design found here.


The Cherry 60 Euro 3D Printer is a very simple design that lends itself to being relatively easy to build and very low cost.  The speed will certainly be the most limiting factor.  It uses very cheap 28BYJ-48 stepper motors, which are slow and don't provide as much torque as a Nema 17 stepper motor.


But they are cheap, easy to find and can be hacked for better performance.  Which leads me to my main goals for this project.


  1. Inexpensive (Under $100)
  2. Easy To Build
  3. Functional
So stick around, as I will try to document the process here.  More to come.

Tuesday, June 7, 2016

What's Been Going On

Sorry for the long hiatus.

I've been mostly busy with my 3d printer.  Looking for models to print, designing new objects with TinkerCAD and OpenSCAD, and flying my quadcopters when I get a chance,

The weather here has been pretty nasty this summer so far, with rain making it wet and humid.  All together not very enjoyable to be outside.

OctoPrint Setup

One of the cooler things I have done recently is to setup an OctoPrint server to run my 3d Printer,


I am using my Raspberry Pi Model B+ to run the server software.  It was a pretty simple setup which only took about 30 minutes.  Luckily, my Logitech webcam worked with no problems and this has allowed me time lapse all of my prints.  Here are just a couple...


Anyway, I will try to make posts more often... letting you know what I'm up to!


Thursday, February 25, 2016

The Culprit

After much consternation the last few days, I have finally solved the riddle of my extrusion problems.  The culprit...


The K-Extruder that I am using, is slipping AND chewing, which is causing barely any filament to be extruded.


While I have been raising the temperature higher and higher, the lower viscosity of the PLA was not helping it extrude any more than above.

Again, I found the solution to the problem when the "rocker arm" actually broke.  While I had to fix the arm to print, I used a small clamp to keep the bearing pressed against the filament.  That's when I realized my problem.  The extrusion problem immediately went away and I was printing at 205 C instead of 230 C.  Eureka!

I of course, immediately printed a replacement arm, and here it is, working better than the original...


I have printed an extra, just in case (or when) this one breaks.  So far, it has been strong enough to keep adequate pressure on the filament for the printer to work.   I am not sure how long this will last, but at least I know the source of my issue.

I have been considering another extruder option, and that is a "bowden extruder".  It's a simple and inexpensive change that may give me better extrustion AND better printing quality.  For now, I will see how well I can keep the K-Extruder working.

Monday, February 22, 2016

New Hot End

Well out of frustration with the hot end I was dealing with, I ordered another one... but with a 0.4mm nozzle.  Unfortunately though, they shipped the wrong one.


The vendor was quite splendid in handling the issue though, and a correct one should be in the mailbox when I get home this evening.  I was told that I could keep the all metal h-head to "tinker" with.

Well having the whole weekend, I decided to try an use the all metal version in my printer.  The results are fantastic... but it was quite an ordeal getting it going.

My first mistake was over-handling the hot end and breaking a lead to the thermistor.  The wires are very delicate... and too much flexing and stretching will definitely weaken or break them.  So how do I fix this?

First I tried the thermistor in my old hot end... but it was permanently cemented into the block.  So that was a no go.  Was I finished? No.  Let me look at the broken lead again...

Well it was about half an inch long.

I can't solder a new wire to extend it.  My only choice is to physically tie the wire to the short, incredibly fragile lead.  Needles to say, I managed it... and actually managed to secure the full signal wire to match the other lead.  Test it with the multimeter... 9.9Kohms... great... it still works and the connections are holding.

So I then installed the hot end and fired up the printer.  The temp worked fine... but it would not heat!  Check the voltage.... 12V... good.  Check the connections... good.   It was a bad heater cartridge.  Great!

I thought... wait I can use the old one!  I disassemble the hot end, try to remove the bad cartridge... and bingo... one of the grub screws holding it in is stripped!  I can't win for losing.  Was I finished now?  No.  Let's get the drill out.

And I drilled the damn grub screw into non-existence!  With that, I was able to install the old cartridge and assemble the whole thing again.

This time it worked!

I had an even more fun time learning how to use the new metal hot end, must the printing has improved greatly.  Maybe, I will complain about that later.

Parting shot...