Showing posts with label Cherry. Show all posts

Wednesday, August 17, 2016

Differences From The Basic Cherry 3D Printer

Here are some of the changes that I am having to face when trying to build my own version of the printer.

Base Material
About the only locally source of MDF is from the Home Depot hardware store.  I chose to use a 1/2"inch thickness which works out to 12.7mm.  I was able to buy a 2ft x 2ft piece for about $6.  This would be sufficient for the base and any extra bracing I might want to add.


Base Construction
Instead of gluing the base together, I chose to use small wood screws.  Only a few are needed in a few key spots to hold it all together well.


Smooth Rod Lengths
While I was eventually able to source the correct lengths of smooth rod for the printer, I decided to use a set of different lengths to see how they affected the design and construction.  For the X-Axis smooth rods, we have to adjust the width of the base to accommodate for the difference from the 17.5 cm.  With different Y-Axis smooth rods, our bed length will change.  Finally, any differences in the Z-Axis smooth rods have little impact on the overall design.


Thursday, July 21, 2016

Finally Ready To Begin

Well the smooth rods and linear bearing I ordered off of AliExpress arrived.  So I finally can begin the construction of my version of the Cherry printer.

I took some time to sort out the parts last night and for a "bare-minimum" printer, there were still a lot of parts to keep track of.  I have already identified a need for a picture of all the parts for the documentation.  So much to do...

Here are some of the initial tasks I will have to tackle first...

  1. Sort and document all the parts that will be used in the build
  2. Cut the pieces for the printer base
  3. Perform, record and document the bipolar conversion hack on 4 28BYJ-48 motors.
    1. Remove Cover
    2. Cut center trace
    3. Cut or de-solder red wire.
    4. Add extension wire
    5. Replace cover
  4. Cut the motor holes in the top deck of the printer base
    1. Z-Axis Motor Holes (ends)
      1. Assemble X-Axis carriage and X-Axis smooth rods with the X-Axis end pieces.
      2. Insert Z-Axis smooth rods into Z-Axis motor holders.
      3. Place the whole X-Axis assembly onto the Z-Axis smooth rods
      4. Measure or trace the position of the Z-Axis motors and their holders.
      5. Cut the motor holes as accurately as you can
    2. Y-Axis Motor Hole (center)
      1. Center the Y-Axis Motor Holder
      2. Trace the hole position
      3. Cut the motor hole
  5. Perform, record and document the initial assembly of the RAMPS 1.4 board
    1. (Research)
    2. Mount on the Mega
    3. Mount each stepper stick module
    4. Apply heat sinks to stepper stick
  6. Start a Build Manual on Google Docs
While I intend to cite every resource that I use to get this printer going, I will try to keep the document rather self-contained and complete.  By documenting each step... as I do it, I hope to build something that others will find helpful.

Well let me get to it... :-)

Monday, July 11, 2016

Cherry Printer Update

Well after about a month of shopping online and waiting, I still have critical pieces of the printer missing for the build. :-(  The pieces I am talking about are the linear shafts and bearings. Everything else I have ready to go.

In the interim, I have taken to using SketchUp to plan the build as well as to use for illustrations for the build document.  Here are some sample shots of what I have mocked up so far...


There are certain aspects of the build that I need to keep as flexible as possible.
  • Varying Smooth Rod Lengths
  • Optional Z-Axis Frame for Better Bracing
  • Different Build Plate Sizes And Types
  • Different Bowden Extruders


Wednesday, June 15, 2016

Initial Cost Projections

While the availability of most of the components is pretty high, there are some parts that will be hard to come by.

Smooth Rods (8mm)
Six of these are needed to for the three axis that will be traversed during printing.  While the design calls for 4 x 17.5cm rods and 2 x 22cm rods, coming by these dimensions may be difficult.  So I am prepared to substitute and use other lengths.

Threaded Rod (M5)
The metric M5 threaded rod will also have to be sourced.  Threaded rods in my location are all based on English units which makes a difference in the configuration of the printer.

The rest of the parts should be readily source-able...

DescriptionPriceQuantityTotal
12 - LM8UU Linear bearings$8.081$8.08
2 - GT2 Pulleys + GT2 Belt$5.241$5.24
10 - 624 Bearings$2.761$2.76
Bowden Extruder Drive + NEMA 17 Stepper$17.501$17.50
PTFE Tube$2.001$2.00
Arduino Mega + RAMPS 1.4 + 4xA4988$22.791$22.79
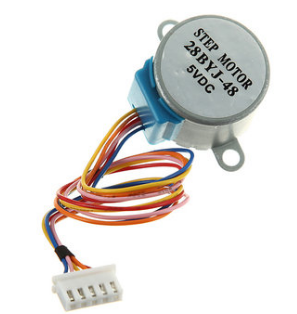
28BYJ-48 Stepper Motor$1.654$6.60
3 - Endstop Switches$2.691$2.69
Hotend$9.991$9.99
$77.65

Monday, June 13, 2016

My Next Obsession

I have been feeling the bug for a new project, and I think I have one.  I think I would like to build my own 3d-printer based on the design found here.


The Cherry 60 Euro 3D Printer is a very simple design that lends itself to being relatively easy to build and very low cost.  The speed will certainly be the most limiting factor.  It uses very cheap 28BYJ-48 stepper motors, which are slow and don't provide as much torque as a Nema 17 stepper motor.


But they are cheap, easy to find and can be hacked for better performance.  Which leads me to my main goals for this project.


  1. Inexpensive (Under $100)
  2. Easy To Build
  3. Functional
So stick around, as I will try to document the process here.  More to come.